3 chairs

3 chairs
Showing posts with label Maloof joint. Show all posts

Monday, January 30, 2012

All I lack is finishing!

It's an old joke but in this case it's true. All I lack is staining and finish. I spent Friday fitting all the slats to the holes and Saturday doing all the sanding on the slats. 
Here's the bench dry fit
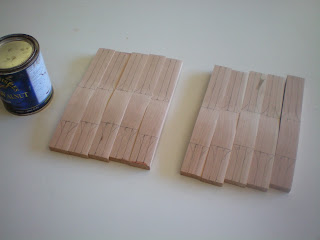
And 10 of the sanded slats.
Saturday evening I got the the first section glued together. I decided it would be easier to do one section at a time.
We had guests at the B&B this weekend so after breakfast Sunday I glued the second section together. After cleaning the shop (it was a mess) I glued the third section. I guess I didn't take a picture of that.

Since I've been talking about bluebonnets I thought I would show you how big the plants are getting. Very unusual for January.

No blooms yet but it won't be long.
And in other news, we had our first baseball practice yesterday! I am so ready for baseball! We practice at Schreiner  University in Kerrville. They are a Division 3 program with a new coaching staff and they have been very gracious in allowing a bunch of old guys a place to train.

This is Sammy. He pitches and plays second base.

Johnny getting some BP.

And here it is! First thing this morning I started shaping the head crests in the back.

Try to make it all flow together in away that makes sense.

Another view of the back.

Rear center leg joint.

I wondered for awhile the best way to blend the front. I kinda like this.

Center legs protrude just a little and then rounded.

Good view of that detail.

Nice lines.

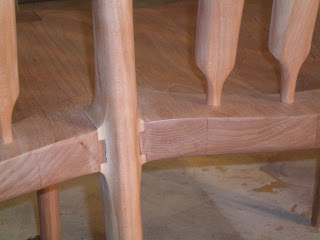
Front leg joint.

Rear leg joint.

All of this shaping is done in the same manner as we have already talked about. Grinder, die grinder, rasps, and sanding. If you enjoy standing in one spot sanding for hours and hours, you will absolutely love doing this kind of chair.

Front center leg through tenon. This would have looked great with wedged tenon but I didn't think of that until just now! Next time. Tomorrow I'll go to Kerrville and get some stain and hopefully get it stained in the afternoon. I'll keep posting pictures of this till it's done.

Thursday, January 26, 2012

And More

Another beautiful day in the Hill Country!. That rain yesterday really helped the river, and the bluebonnets are everywhere! If it stays warm they might be blooming soon. I hope they don't because we've seen those late freezes kill the whole crop. There is still winter left!

Started the day by cutting the curves in the head crests on the bandsaw. There is still a lot of smoothing to do after the cut and I took this picture to show you that you don't always need an expensive tool to do something. This is a Stanley sure-foam rasp I got at one of the big box stores for about $15 dollars. It does a great job of removeing a bunch of material in a short period of time, but you still have lots of control. If you enlarge the picture you can see where the tool mark is and just how the rasp is working it's way down. Follow that up with some finer grit rasps and sanding.

I put the head crests in to mark the drill lines for the back slats.

This is just so I can get an idea of what the overall chair will look like.

And speaking of back slats, here's the rest of them. Profiles have been cut and marked up for the face cut. This takes awhile!

After the face has been cut I sand them with the oscillating belt sander and use the 1/4" round over bit on the tops and bottoms.

The backs on the fat part get rounded over with a 1/2" bit. The fronts of the fat part don't get rounded. Why? Just because. After this is a lot of sanding and getting the bottoms to fit the holes in the seat, cutting the length, and fitting the tops in the holes in the head crest. Pictures of that tomorrow.

And in other news, the slab was poured for Peggy's garden shed so I guess I have to start framing it next week. Anybody know where I can get some old corrugated metal or old ship-lap siding?

Thursday, January 19, 2012

I'm Back!

I want to apologize for my absence. I've been doing some repairs at a house in Utopia and haven't been able to get much shop time in the last week. I still have couple more days on the repair job but I hope to get some time this weekend to further the progress of the bench. Peggy has other projects for me also.

                                       This is the sunset Tuesday. Just another day in paradise!


I glued the outside legs a few days ago (I think last Saturday).This shows about what the arm will look like.


Glued the center legs yesterday evening.

And just to show you no one is perfect, I'll tell a short story about this picture. The seat has been wanting to curl up on me since I glued the 3 segments together. I had it clamped to the bench for several days hoping it would straighten and it kinda was. I went to the shop on Sunday to work a little and found that the seat had split on this joint. Not a pleasant sight, but I didn't freak out! I was able to completely separate the joint and using my #5 plane I made a very slight bevel on both pieces- about 1/16" to nothing. The outside legs were already glued on making clamping to the workbench difficult, but it worked well. I glued the 2 parts of the seat back together, re-worked the leg joints, and the seat is much straighter; so it was happy ending. Don't tell Ronny Miller!

This afternoon I was able to shape all the leg to seat joints. This is a before picture showing the plugs in the legs. Front and back outside legs are glued and screwed.

I primarily use a die grinder with a 1/2" sanding sleeve followed by sanding with the random orbit. I also have a 1/2" carbide grinding bit for the die grinder for heavier removal.

I also ground down the tenons on the center front legs.

A couple of after shots.

This whole process took about 4 hours this afternoon.

Back legs are done also. Next is the arms but probably not till the weekend. Jesse thanks for your comment. If you get a chance, send a picture of the cabinet you're going to do. If I can be of any help just let me know.

Tuesday, January 3, 2012

Day 2 on the bench

Another great day in the Texas Hill Country! Didn't play golf though. I spent the morning getting the seat ready to glue together. Lots of details to take care of that are easier now rather than later. By the way I buy my 8/4 (2") lumber from Allen and Allen in San Antonio. The guys there are great!

The legs fit it rabbeted notches. These are called Maloof joints after the great craftsman Sam Maloof. If you do search on him you'll be impressed by the clean lines as well as the detail in all his furniture. I first saw one of his rockers at one of the Smithsonian museums in DC. It was a double rocker in tiger maple and I was so struck by it I knew I had to learn how to build that type of chair. Still learning! 

This is one of the centers. The front leg will fit in the mortise closest to the bottom. The bottom is rabbeted like the rest of the leg notches. The intermediate back legs fit in the notches at the top.

I decided to do the glue-up in sections since the seat is very long. I used epoxy on all the pieces for strength as well as it's ability to fill gaps. Not that there will be gaps! No way! The epoxy cures overnight. Tomorrow morning I'll glue these three together and let that dry overnight.

Got started on the front legs. They're milled to 1 3/4" x 3 1/2" x 21"

Dadoes are cut before the shape is cut. Above and below the dado will get a 1/2" round over to fit the rabbet on the seat.

These tenons will fit in the mortise shown above. I cut them a little over size. When the seat is completely glued together I'll make them fit.

The inside of the outside front legs (confused?) get a slight taper then all the legs get rounded over. More on that in the days to come.

One of the seat sections. I love to read comments and answer questions so don't be shy. Have a great evening!