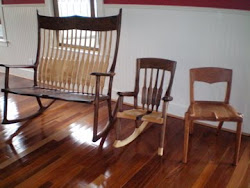
3 chairs

3 chairs

Sunday, December 25, 2011

MERRY CHRISTMAS!!!


 I want to wish everyone a very Merry Christmas! I hope Santa was good to you and all the kids and grandkids. No woodworking today but I would like to share some pictures that have something to do with Christmas.

Peggy took these first three pictures when we were in Denton. I think they're pretty cool.


I think these are some cards she liked.

Lily took some pictures while we were driving to her house the other night. I think she has a good eye for photography!

Nana took this on the way home.


This is Henry. He's 4 and very active!

My nephews, Christopher and Andrew, the two on the right, got to go snowboarding for the first time this week! About time! They went to Purgatory in Colorado after being stuck in Denver overnight. They come home today and I know they had great time.

Santa brought Lily a new baby! I bet there was a whole lot more!

Henry got a new Spiderman bike. Spiderman is the coolest!

I hope you are spending your Christmas with friends and family and if not they will call or you will call them. Either way let's not forget the real reason for Christmas is the celebration of the birth of our Lord and Savior, Jesus Christ. Merry Christmas everyone!!!


Saturday, December 24, 2011

Christmas Eve


We were lucky enough to spend most of the last week in Denton visiting our son Ian and our grandchildren Lily and Henry as well as lots of our friends. We had a great time! I delivered the chair to Nancy Stroud and I think she was pleased. She plans to use it in her office. While we were there I received a commission from my pal Ronny Miller for a bench for the dining table. It will seat 6 and have a back and arms and Ronny's wife Renee wants to be able to put some throw pillows on it. I have some ideas about what I want to do so I'm going to have to figure out how to draw it in Sketchup. Ronny and I always play on the same team when we play golf against Jimmy Staggs and Paul Carpenter. We played Wednesday and Paul couldn't make it so we got Bill Chamblee to fill in. Had a lot of fun.


I never win. Except this time! I'm rich! So happy to take Jimmy's money.

I built this house in 1980. We lived here until 2007. Raised our kids and made a lot of great memories.

Lily and Henry writing on the wall at Rooster's, a great little restaurant in Denton.


And here's the chair. Turned out pretty nice.

It's really shiny because I had just put a coat of oil on it. It will eventually have a nearly semi-gloss sheen.

Front leg joint. You can see the plugs. All of the joints are glued and screwed.

I really like walnut.

So I'm going to have to spend a little time designing and will go next week for some materials for the bench. I'll have an update soon. I hope you all have a Merry Christmas and a safe New Year!

Friday, December 16, 2011

December 16


Got a lot done on the latest chair. Looking back at my first post I promised to share pictures of past projects and I haven't done that yet. I'll do that next week. That's a promise. For now here are the pictures from today. I guess I need to add a link for my website. You can see it by clicking here.
Here it is! Legs and stretchers glued up.

Then it's time to turn our attention to the head piece. It starts as 3 pieces 5 x 19 x 1 3/4. Glue them together and you have a really thick piece of walnut. It gets a dado on the back to fit the back leg and is then cut to shape on the band saw. The bottom has to be shaped and sanded to 600 because you can't get in there after it's glued on.

And there you go. After the glue dried a while I drilled some holes and reinforced the joint with screws and then plugged the holes. 

The areas where the legs join to the seat will be shaped after the glue is completely set. Usually overnight. By the way I use Titebond II or III almost all the time.

The legs also are reinforced with screws and then plugged.

The stretchers look nice as well as being functional.

Again this will get shaped later. All of these joints will be fared making it look like it kind of grew like this. By the way I did not design this chair. It was designed by a very talented woodworker by the name of Scott Morrison. He builds beautiful Maloof style chairs. You can see his work by clicking here.

Thursday, December 15, 2011

December 15


Today was a very good day. I made lots of progress on the 3 legged chair and I thought I would share  several detail pictures of the process.

This is one of the front legs with the dado cut. You can see the shape that will be cut. The legs get a 1/2" round over above and below the dado on the inside edge.

The seat notch with the rabbet cut. This is called a Maloof joint.

 Profile cut on the legs.

This is a test fit. Usually there is a little tweaking to get the legs to fit tightly.

These fit really well. This is the back leg.

The legs get rounded over. I start this process with a grinder that has a 24 grit sanding disc, making some sweeping passes. When I have the rough shape I use a couple of rasps to refine the shape. Then sanding, sanding, and more sanding.

One done!

Detail

Looks better. The seat and leg joint area get shaped after glue up.

These are the stretchers for the legs. The longer one will run between the front legs and the other will go from the back leg to the front stretcher forming a tee.

Now that these are rounded I have to drill the holes for them in the legs and fit them. Then we'll glue it all together and turn our attention to the head piece.

Wednesday, December 14, 2011

December 14


The collector is up and running and it works really well. There is a remote for it which is really convenient. Dust collection is good at all the tools and excellent on some. The table saw would need an over-arm collector to be 100%. There is always some dust escaping from the top especially with the zero clearance plate in. I need to add a hose to the bottom of the shroud on the miter saw and I have enough fittings left to do that. As far as sound goes it's not a whole lot louder than the shop vac. The only machine I didn't use today was the shaper but the planer got a lot of work today and that real puts out the chips. So over all I have to give the Oneida Pro 2000 a solid 5 stars. On to wood working: If you recall I started Nancy Stroud's tea chair just as the delivery was being made on Wednesday. I cut the leg notches and routed for the joint yesterday evening. I glued the seat up and let it dry over night.

This morning I cut the seat shape on the bandsaw and did the shaping and sanding.
The 2 pieces on the left will be the lower stretchers.
They wil get shaped tomorrow.


I cut and milled all the wood for the legs and head crest and glued them up. These need to dry over night. I'll have some detail pictures tomorrow as these will get cut and shaped.
And finally, this is our 7 year old granddaughter Lily.
She was in a Christmas play at school yesterday. As I understand it she was the Mayor's wife. Isn't she great!? Wish I could have been there! 


Monday, December 12, 2011

December 12


We had B&B guests this weekend. 2 great couples from Austin. Peggy had to work on Saturday so I was in charge of the cooking. Let me tell ya, I make a pretty mean buttermilk biscuit! Just saying. I was able to work on the DC system Saturday and Sunday afternoon and I got some done. Spent all day today on it and all the duct is installed! Still have to run a new circuit and I started pulling wires for that a few minutes ago. Decided to stop since I'll have to turn off the power and it's too dark for that now. Thought I share some before and after pictures.

This a panoramic view I took last Tuesday when I finished cleaning the shop. 

Last Tuesday from the front looking back.

Left side of the shop looking back.


This is how we look now. The collector and the planer.At the right foreground is the drop for the table saw and jointer.

A better look at that and the shaper and floor sweep in the back right.


I built a hood for the miter saw. I'll have to see if this works . If not we'll go to Plan B!

The drum sander in front and the band saw in the back.

Looking from the back of the shop.

I wonder how loud it's going to be. Find out tomorrow. Have a good evening!


Saturday, December 10, 2011

December 10


Got going on the duct for the dust collection yesterday. A lot of boxes and a lot of fittings! Everything goes together well and they provide a crimp tool if you need to make one end smaller to fit in the adjoining pipe. The plan provided is very detailed and easy to read. The only adjustments needed are in the straight sections of pipe. They are all 5" sections and they are not snapped together which makes for easier cutting. Still this is 26 gauge metal so it's pretty robust.
Some of the fittings.

More fittings

This is the line going to the shaper and floor sweep.

The other end of that run.


Floor sweep.

The shaper has 2- 4" dust ports, one off the back of the fence and one that draws from below the cutter.

These are the blast gates. They are used to control which line is in use.