3 chairs

3 chairs

Monday, January 30, 2012

All I lack is finishing!

It's an old joke but in this case it's true. All I lack is staining and finish. I spent Friday fitting all the slats to the holes and Saturday doing all the sanding on the slats. 
Here's the bench dry fit
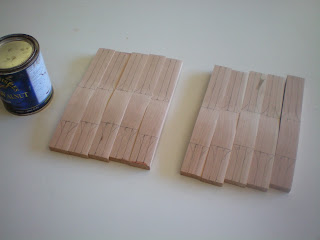
And 10 of the sanded slats.
Saturday evening I got the the first section glued together. I decided it would be easier to do one section at a time.
We had guests at the B&B this weekend so after breakfast Sunday I glued the second section together. After cleaning the shop (it was a mess) I glued the third section. I guess I didn't take a picture of that.

Since I've been talking about bluebonnets I thought I would show you how big the plants are getting. Very unusual for January.

No blooms yet but it won't be long.
And in other news, we had our first baseball practice yesterday! I am so ready for baseball! We practice at Schreiner  University in Kerrville. They are a Division 3 program with a new coaching staff and they have been very gracious in allowing a bunch of old guys a place to train.

This is Sammy. He pitches and plays second base.

Johnny getting some BP.

And here it is! First thing this morning I started shaping the head crests in the back.

Try to make it all flow together in away that makes sense.

Another view of the back.

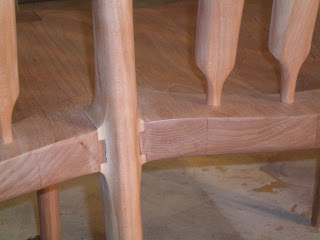
Rear center leg joint.

I wondered for awhile the best way to blend the front. I kinda like this.

Center legs protrude just a little and then rounded.

Good view of that detail.

Nice lines.

Front leg joint.

Rear leg joint.

All of this shaping is done in the same manner as we have already talked about. Grinder, die grinder, rasps, and sanding. If you enjoy standing in one spot sanding for hours and hours, you will absolutely love doing this kind of chair.

Front center leg through tenon. This would have looked great with wedged tenon but I didn't think of that until just now! Next time. Tomorrow I'll go to Kerrville and get some stain and hopefully get it stained in the afternoon. I'll keep posting pictures of this till it's done.

Thursday, January 26, 2012

And More

Another beautiful day in the Hill Country!. That rain yesterday really helped the river, and the bluebonnets are everywhere! If it stays warm they might be blooming soon. I hope they don't because we've seen those late freezes kill the whole crop. There is still winter left!

Started the day by cutting the curves in the head crests on the bandsaw. There is still a lot of smoothing to do after the cut and I took this picture to show you that you don't always need an expensive tool to do something. This is a Stanley sure-foam rasp I got at one of the big box stores for about $15 dollars. It does a great job of removeing a bunch of material in a short period of time, but you still have lots of control. If you enlarge the picture you can see where the tool mark is and just how the rasp is working it's way down. Follow that up with some finer grit rasps and sanding.

I put the head crests in to mark the drill lines for the back slats.

This is just so I can get an idea of what the overall chair will look like.

And speaking of back slats, here's the rest of them. Profiles have been cut and marked up for the face cut. This takes awhile!

After the face has been cut I sand them with the oscillating belt sander and use the 1/4" round over bit on the tops and bottoms.

The backs on the fat part get rounded over with a 1/2" bit. The fronts of the fat part don't get rounded. Why? Just because. After this is a lot of sanding and getting the bottoms to fit the holes in the seat, cutting the length, and fitting the tops in the holes in the head crest. Pictures of that tomorrow.

And in other news, the slab was poured for Peggy's garden shed so I guess I have to start framing it next week. Anybody know where I can get some old corrugated metal or old ship-lap siding?

Wednesday, January 25, 2012

More progress

We got about 1 1/4" of rain last night! I think we missed the really heavy stuff.  Looked like San Antonio got more and North Texas got a lot. But we're thankful for any rain. There are lots of bluebonnets coming up and if we get rain at the right time in March we should have bumper crop.

I drilled the holes for the back slats using a 1/2" forester bit. They are 1/2" deep.

This is the profile I decided on for the back slats.

Here's one now! It's cut out of 1 1/2" stock.

I drilled the holes in the head crest before cutting the profile.

The holes are 3/4" deep by 1/2".

Looks nice.

This is the setup I use for rounding over the edges of the back slats. The tops and bottoms get rounded with a 1/4" bit and the back in the middle (the fat part) gets rounded with a 1/2" bit.

Now we get to see what the chair is going to look like! Takes a lot of shaping to get the slats to fit in the 1/2" holes. 10 more to go! There will be a lot of finish sanding before glue-up because there are lots of places that I won't be able to get to after.

You can see the curve the head crest has.

And this is Peggy wrangling her worms. For some reason the worms live in my office right behind where I am now. She uses the castings (poop) for fertilizer in the garden. Another reason for the garden shed. The guys are supposed to pour the slab in the morning. Isn't country life great?

Tuesday, January 24, 2012

Progress!

Finished the repair job yesterday and was able to get back in the shop today. We are expecting rain tonight which is sorely needed. I hope we get enough to finally bring the river back. I worked for a little while on the bench Sunday but it was such beautiful day Peggy and I spent some time in the garden getting it ready for spring. We planted onions and weeded.

Sunday I got the arms glued on...

and spent some time drawing the profile on one of the head crests. Kinda hard to see but if you click on it you can see it better.

The head crests also curve backwards. This is the top view.

This is the bottom. I also laid out where the back slats will go. There will be 5 under each head crest.

Here's a better shot of the profile. I use the lines as a guide for drilling the holes for the back slats at the drill press.

Today I shaped the arms This is the final shape. You can see the curve that was created by re-sawing and glueing. Adds a lot more interest than a straight arm.

It gets rounded over on the top and bottom.

This is before shaping.

I start the process by drawing a line down the center of the sides. This is my guide. I shape to these lines from the top and then from the bottom.  Then I use my grinder with the 24 grit sanding wheel and make sweeping motions to round the arm. Then the die grinder with the carbide bit to shape the transitions to the legs followed by the rasp and sanding.

Looks better.

Front leg transition. You can see the line that I left. Again just for interest.

Close up.


Rear leg joint. Still lots of sanding to do. I also started the back slats this evening by making a template and cutting one out just to see if I'm on the right track. By tomorrow evening we should have a good idea of what the finished bench will look like. I will mail a color sample to Renee tomorrow since this piece will be stained.

The guys got the rest of the forms done and steel in for the garden shed. I think they wanted to pour today but we got a few sprinkles with more expected tonight. It will have a porch on the front and side.

Here's the onions we planted. We might have a booth at the farmer's market this year!